Google Play Store Deployment Guide
Latest
This guide provides a step-by-step overview of deploying your Flutter application to the
Google Play Store. Follow these instructions to ensure a smooth deployment process and get
your app in front of millions of users.
Prerequisites
Before starting the deployment process,
ensure you have:
- Google Play Developer Account ($25 one-time fee)
- Your Flutter application ready for release
- Basic understanding of using terminal or command line
-
Required application assets:
- App Icon (512 × 512 px)
- Feature Graphic (1024 × 500 px)
- Phone Screenshots
- Tablet Screenshots (if supported)
- Privacy Policy URL
- Short Description (up to 80 characters)
- Full Description (up to 4000 characters)
- Promotional Video (Optional)
Deployment
This section provides detailed instructions for deploying your Flutter application to the
Google Play Store. Follow each step carefully to ensure a successful deployment.
Step 1: Developer Account Setup
Visit Google Play Console to create a Google Play Console and
complete the developer account setup process.
Choose Account Type
- Individual Developer (additional testing requirements)
- Organization Account (requires D-U-N-S Number)
Complete Registration
- Pay the $25 one-time registration fee
- Verify your identity
- Set up payment profile
- Provide contact information
- Accept Google Play Developer Agreement
For Organization Accounts
- Obtain D-U-N-S Number (may take 1–30 business days)
- Submit business verification documents
- Provide organization details
Note:
Google Play Console account verification may take additional time
depending on your region and account type.
Step 2: App Configuration
Before building your Flutter application,
update the required configuration files.
Update pubspec.yaml
Open the following file:
pubspec.yaml
Update the application version:
version: 1.0.0+1 # Format: version_name+version_code
Important Version Note:
-
Version format:
version_name+version_code
-
Example:
1.0.0+1
-
version_name is shown publicly to users
-
version_code is used internally by Google Play Store
-
Always increase the version code for every new release
Example Version Sequence
First release:    1.0.0+1
Bug fix update:  1.0.1+2
Feature update:  1.1.0+3
Major update:    2.0.0+4
Configure Android Manifest
Navigate to:
android/app/src/main/AndroidManifest.xml
Update your application name and icon configuration:
<manifest xmlns:android="http://schemas.android.com/apk/res/android">
    <application
        android:label="Your App Name"
        android:icon="@mipmap/ic_launcher">

        <!-- Your app configuration -->

    </application>
</manifest>
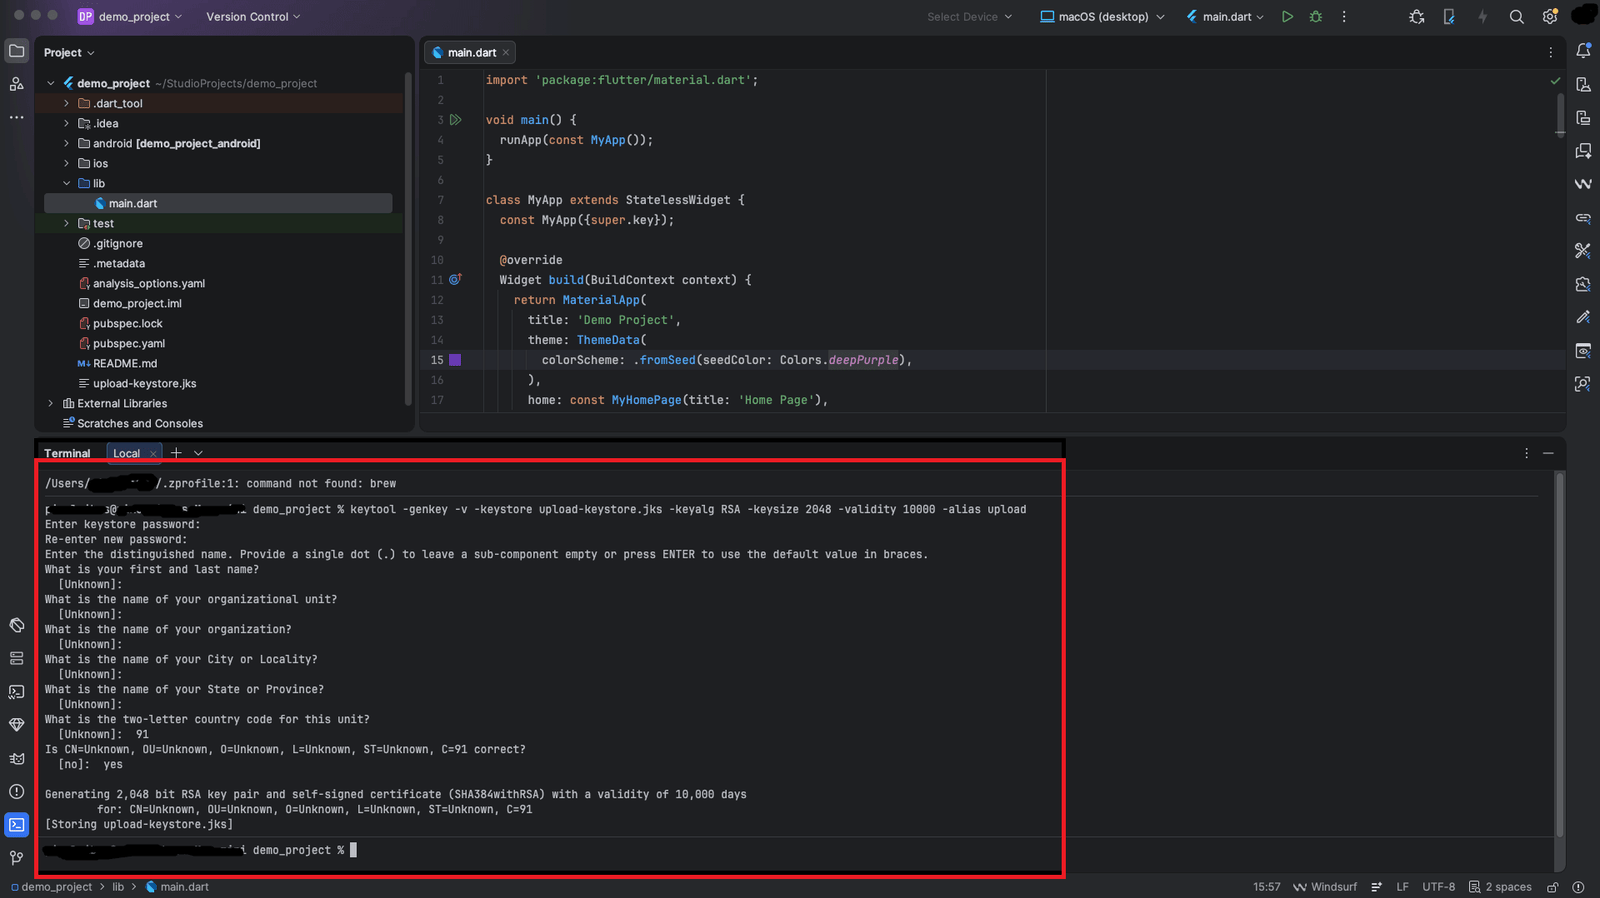
Step 3: Generate App Signing Key
Open terminal in your Flutter project root directory
and execute the following command to generate a release signing key.
For macOS/Linux
keytool -genkey -v -keystore YOUR-KEYSTORE-FILE.jks -keyalg RSA -keysize 2048 -validity 10000 -alias YOUR-ALIAS
For Windows
keytool -genkey -v -keystore YOUR-KEYSTORE-FILE.jks -storetype JKS -keyalg RSA -keysize 2048 -validity 10000 -alias YOUR-ALIAS
Follow the Prompt Instructions
- Enter a secure keystore password
- Provide your name and organization details
- Confirm all entered information
- Wait for keystore generation to complete
Important:
- Store the keystore file securely
- Keep backup copies of the keystore file
- Do not lose the keystore password
- The same keystore is required for future app updates
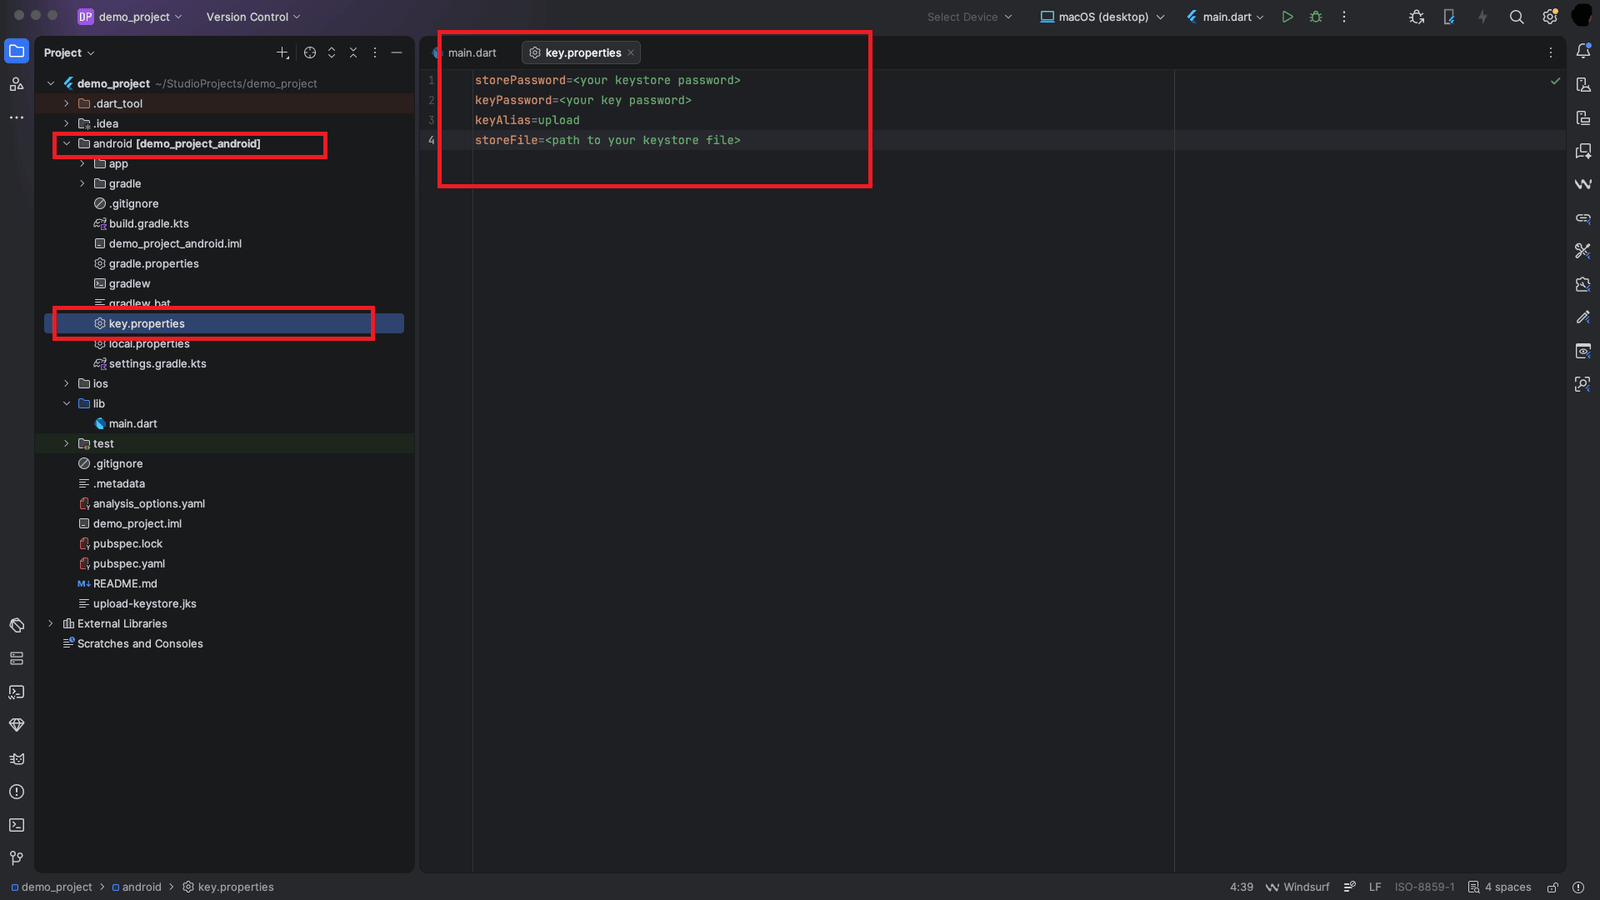
Generated File
After successful execution,
a .jks keystore file will be generated.
Step 5: Build Your App
Open terminal in your Flutter project root directory
and execute the following command to generate the release App Bundle.
flutter build appbundle --release
Optional Build Flags
You can use additional flags for code protection
and crash reporting support.
--obfuscate
--split-debug-info
-
--obfuscate helps protect your Dart source code
-
--split-debug-info helps improve crash reporting
and reduces stack trace exposure
Generated App Bundle Location
After successful build completion,
the generated App Bundle file will be available at:
build/app/outputs/bundle/release/app.aab
Step 6: App Setup
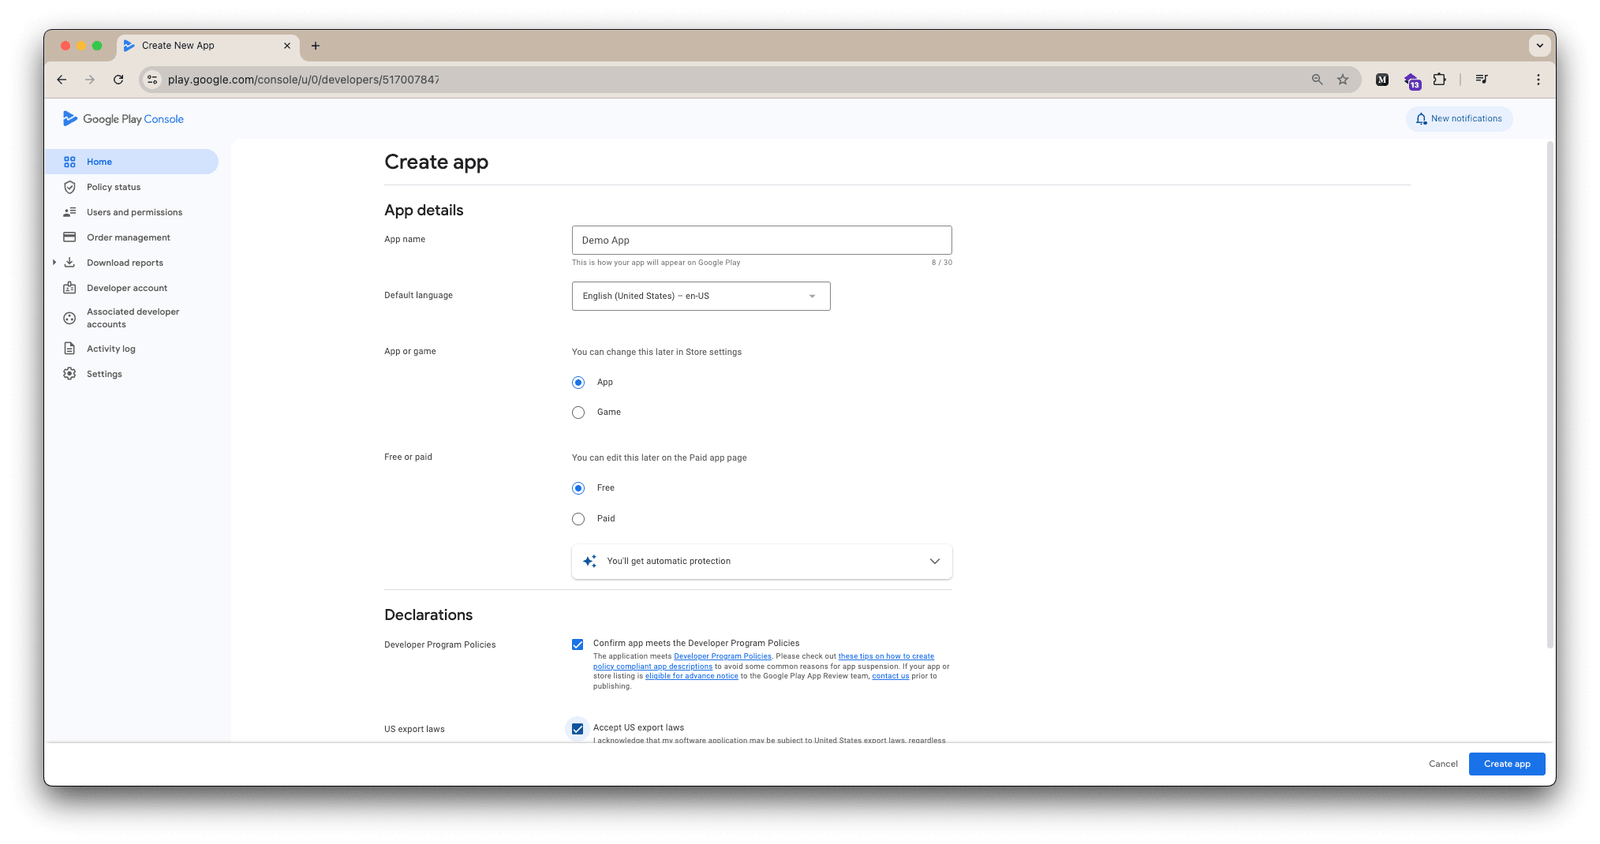
Create App Listing
Open Google Play Console and create a new application.
- Go to Google Play Console
- Click Create app
- Enter your application name
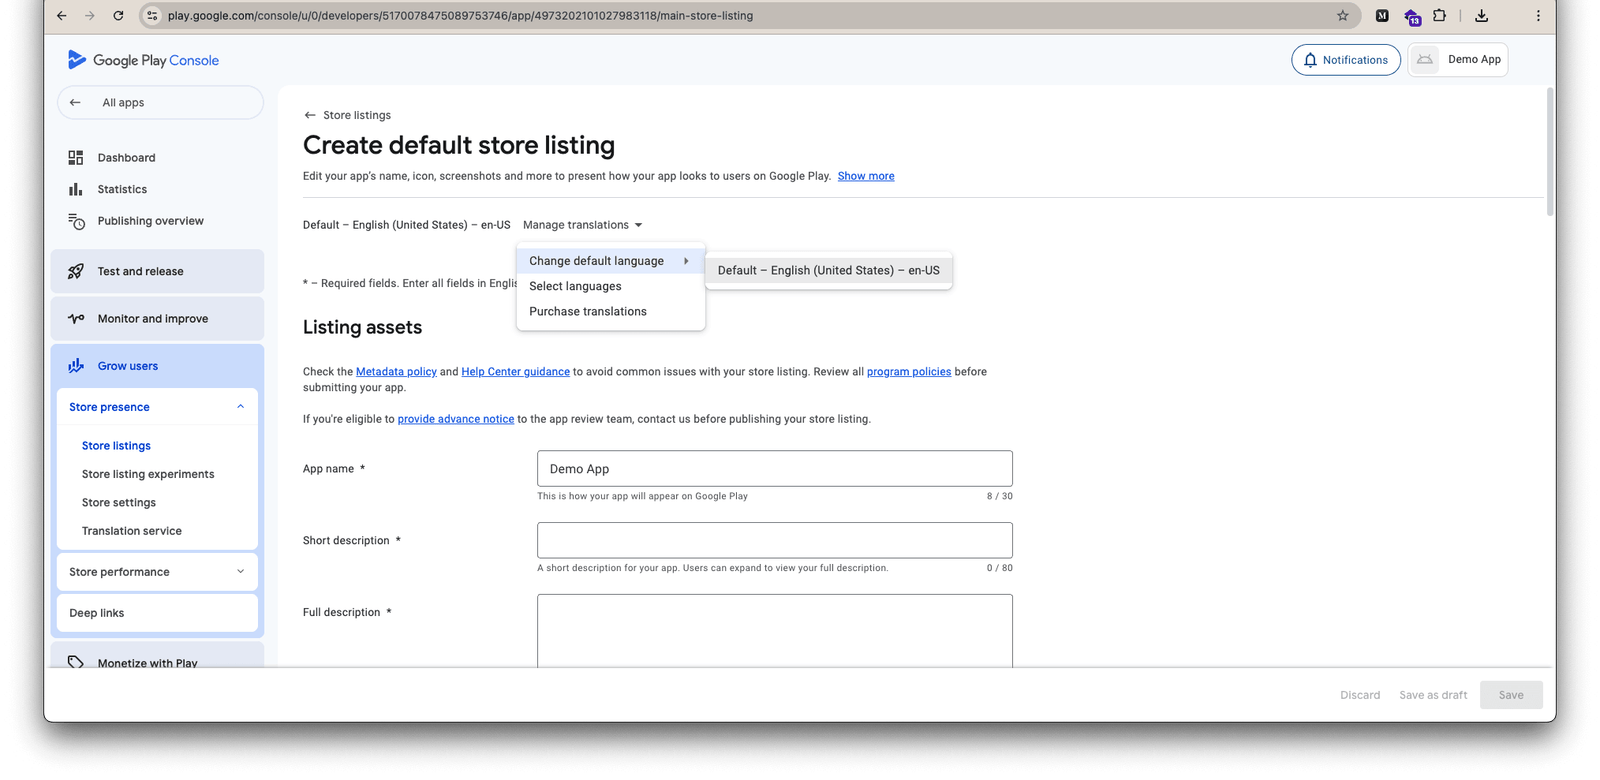
- Select default language
- Select App or Game category
- Select Free or Paid status
- Complete declaration of app content
- Click Create App
Note:
Ensure your application name and category
properly match your application functionality.
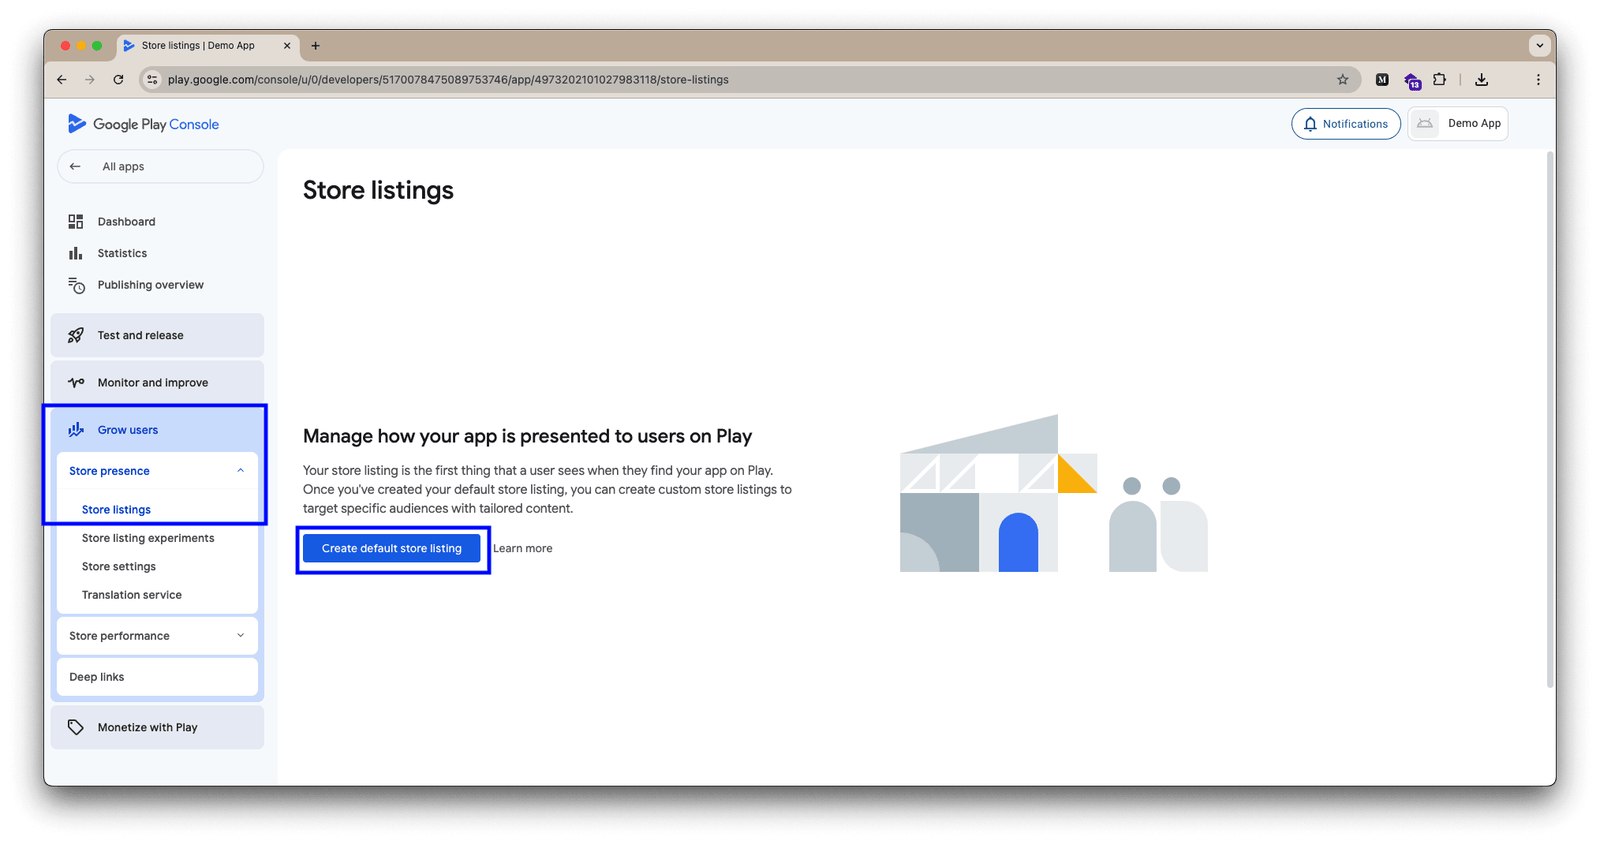
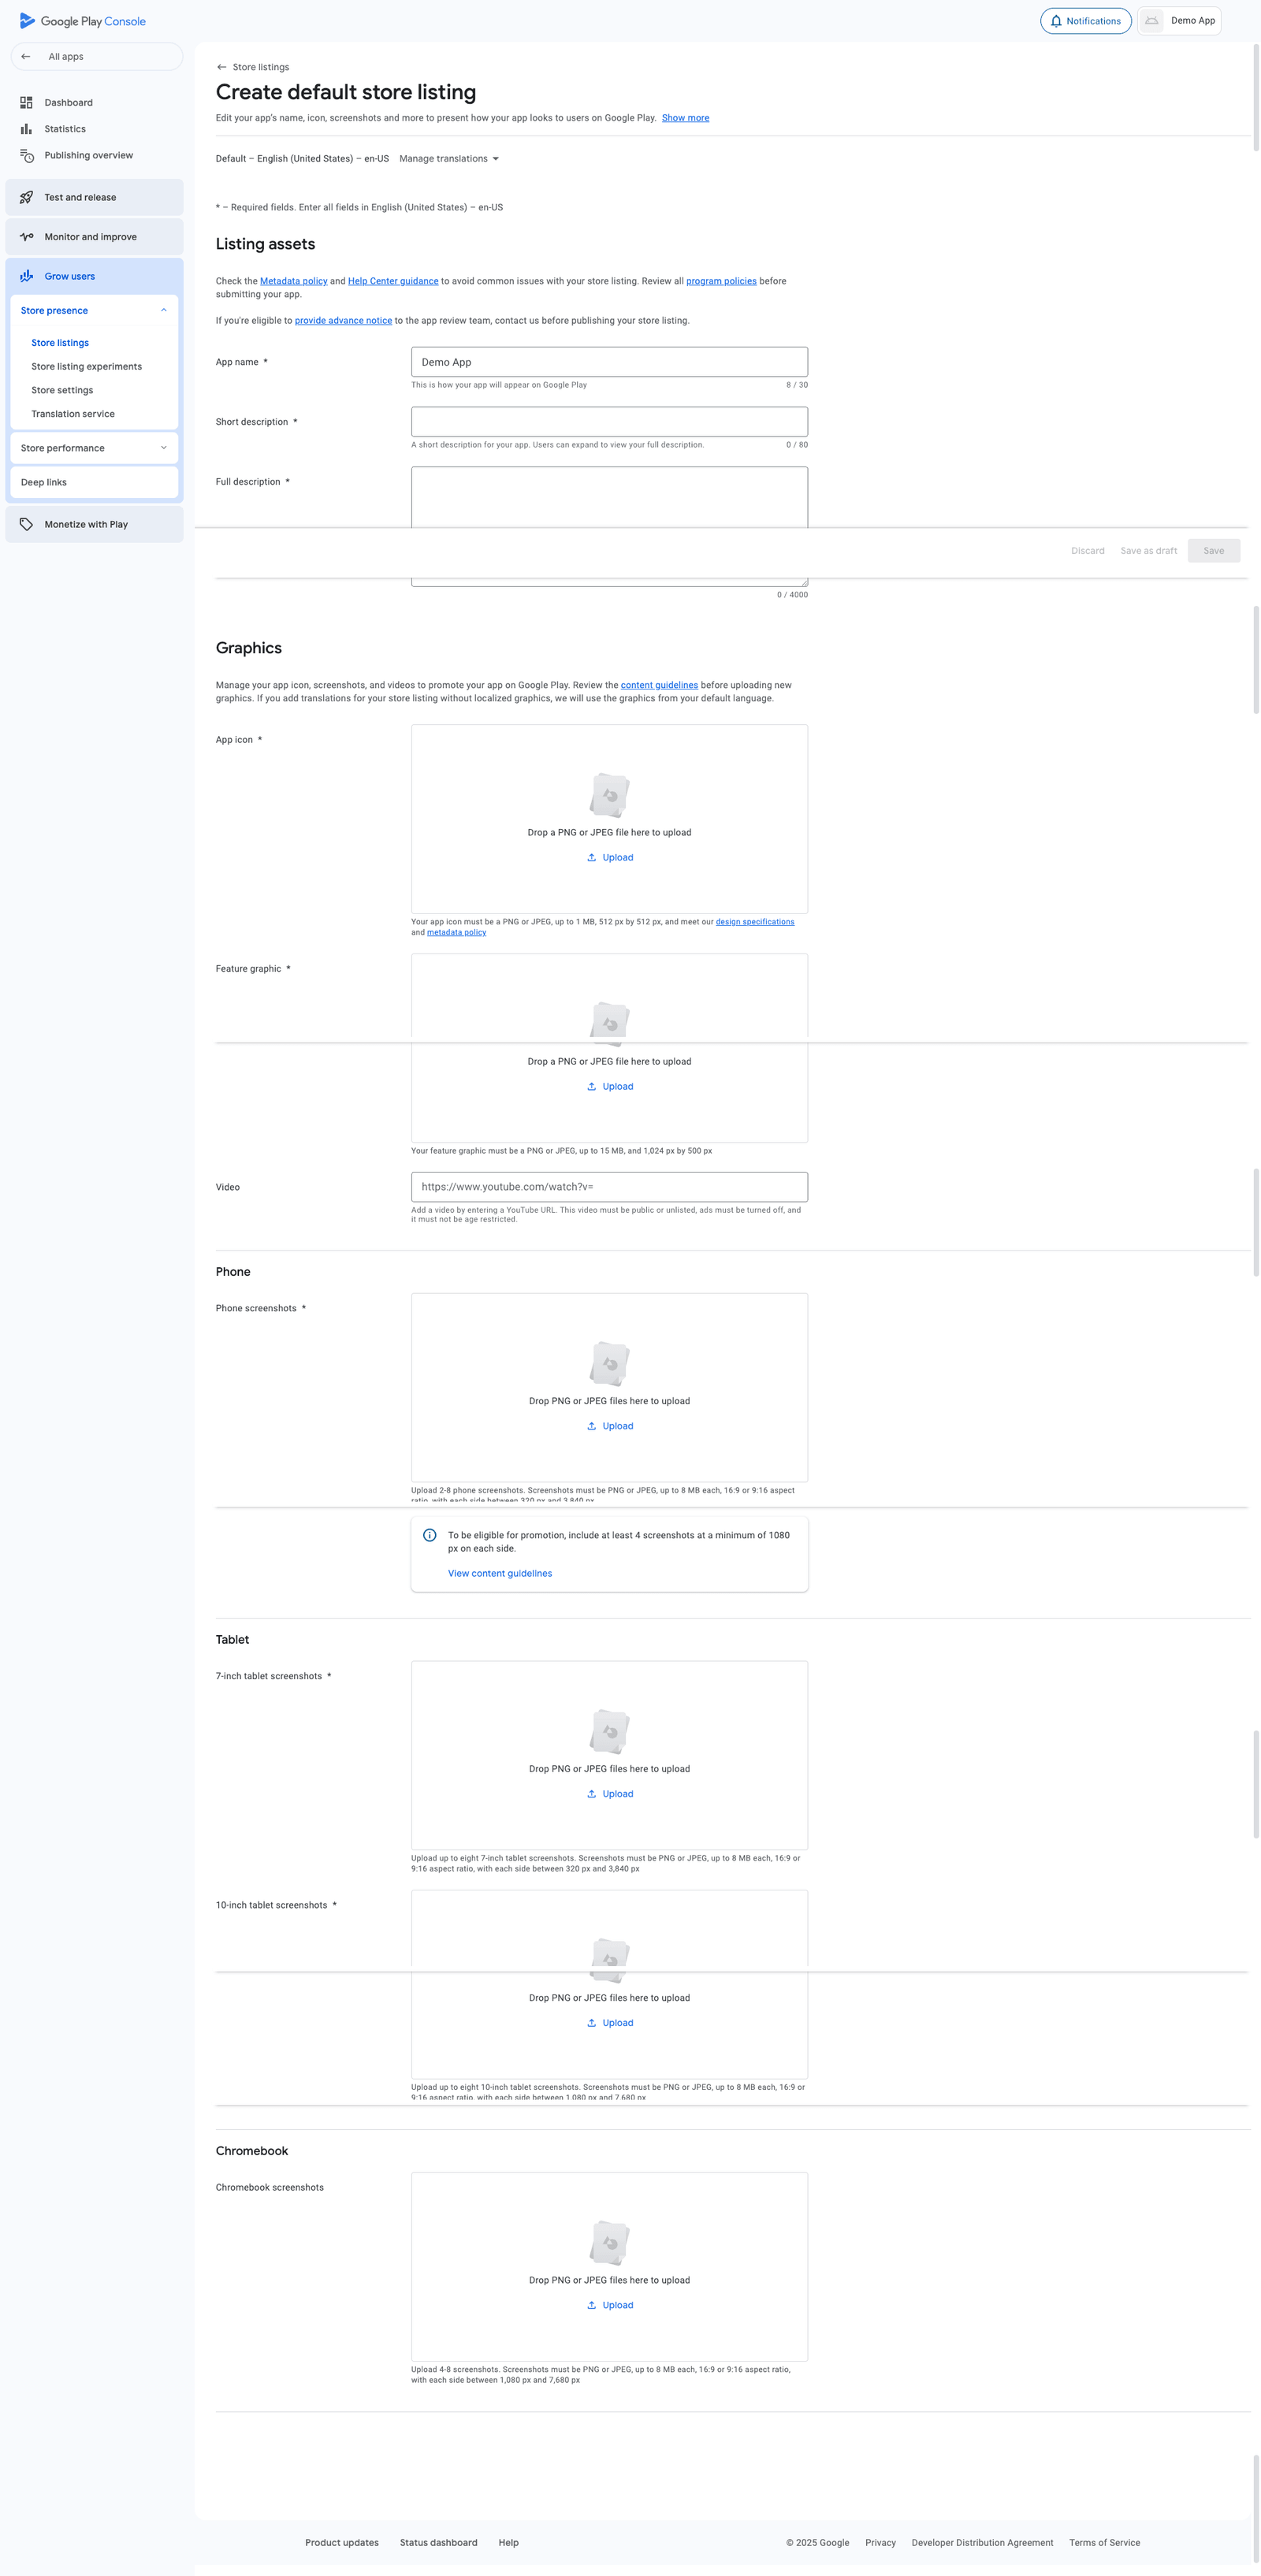
Complete Store Listing
After creating the application,
complete all required store listing information.
- Application Name
- Short Description
- Full Description
- Application Category
- Contact Information
- Privacy Policy URL
Important:
Incomplete store listing information may prevent
your application from being published successfully.
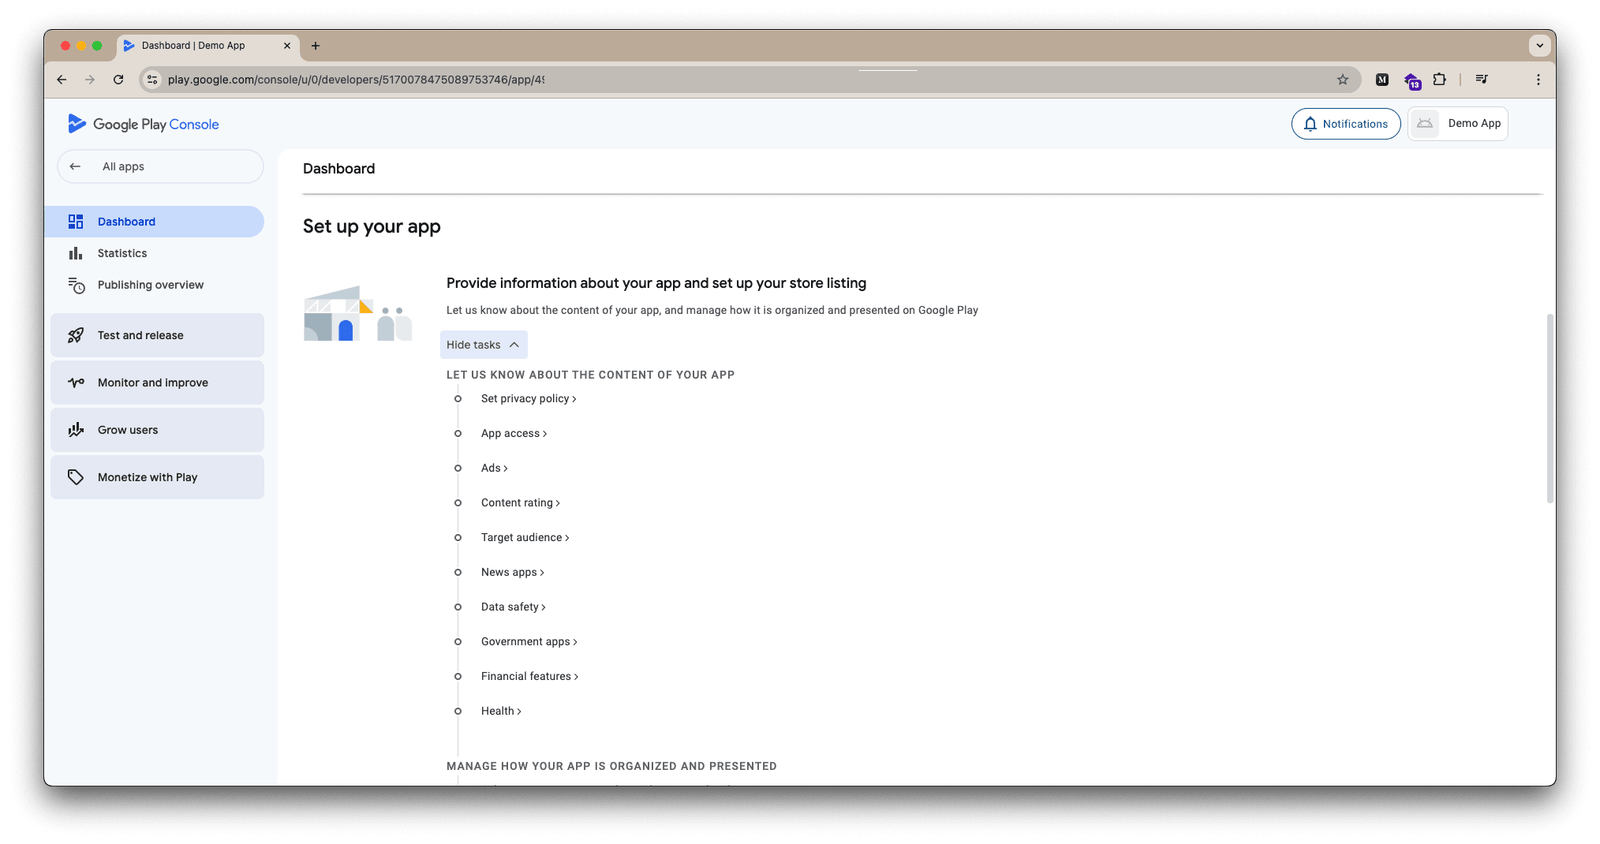
Step 7: Configure App Content & Store Listing
Complete all required Google Play Console content,
policy, categorization, and store listing sections
before submitting your application for review.
1. Set Privacy Policy
Privacy Policy is mandatory for all applications published on Google Play Store.
- Privacy Policy must be publicly accessible
- Users should access it without login
- Include data collection and usage information
- Include security and protection practices
- Include account/data deletion policy
- Include support and contact information
Important:
Missing or invalid privacy policy links
may cause Play Store rejection.
2. App Access
Configure application login and access requirements.
- Specify whether login is required
- Provide test account credentials if needed
- List special access requirements
- Specify region restrictions if applicable
3. Ads Declaration
Declare whether your application contains advertisements.
Supported Ad Types
- Banner Ads
- Interstitial Ads
- Rewarded Ads
- Native Ads
Also declare the ad networks used in your application.
4. Content Rating
Complete the content rating questionnaire carefully.
Content Categories
- Violence
- Sexual Content
- Language
- Controlled Substances
- Miscellaneous Content
Note:
Content rating affects application visibility,
audience targeting, and Play Store eligibility.
5. Target Audience
- Select target age groups
- Specify whether the app is designed for children
6. News Applications (If Applicable)
Required only for applications that provide news content.
- Declare news content availability
- Provide publisher information
- Explain editorial policies
- Verify trusted news sources
7. Data Safety
Declare all collected user data and explain its usage.
Collected Data Types
- Location
- Personal Information
- Files and Media
- Device Information
Data Usage
- Application Functionality
- Analytics
- Personalization
- Advertising
Security Information
- Data protection measures
- Data sharing practices
- User privacy protection
8. Government Applications (If Applicable)
- Verify government association
- Provide official documentation
- Specify jurisdiction details
- Describe implemented security measures
9. Financial Applications (If Applicable)
- Declare financial services offered
- Provide license and compliance information
- Describe security and encryption measures
- Specify supported countries or regions
10. Health Applications (If Applicable)
- Declare health-related functionality
- Provide medical disclaimers
- Explain data protection measures
- List certifications if available
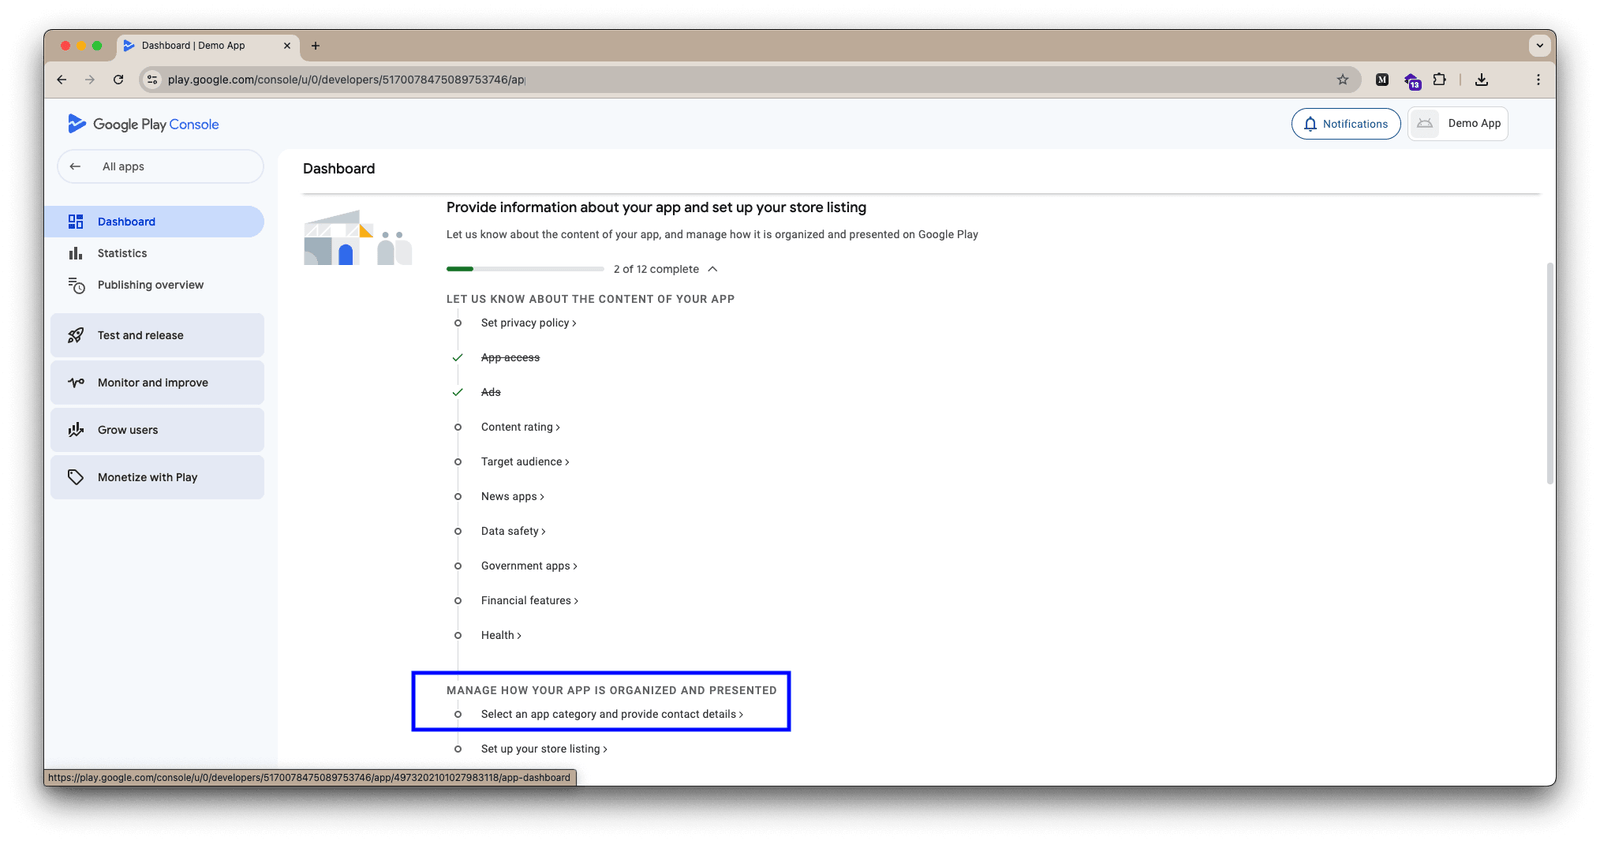
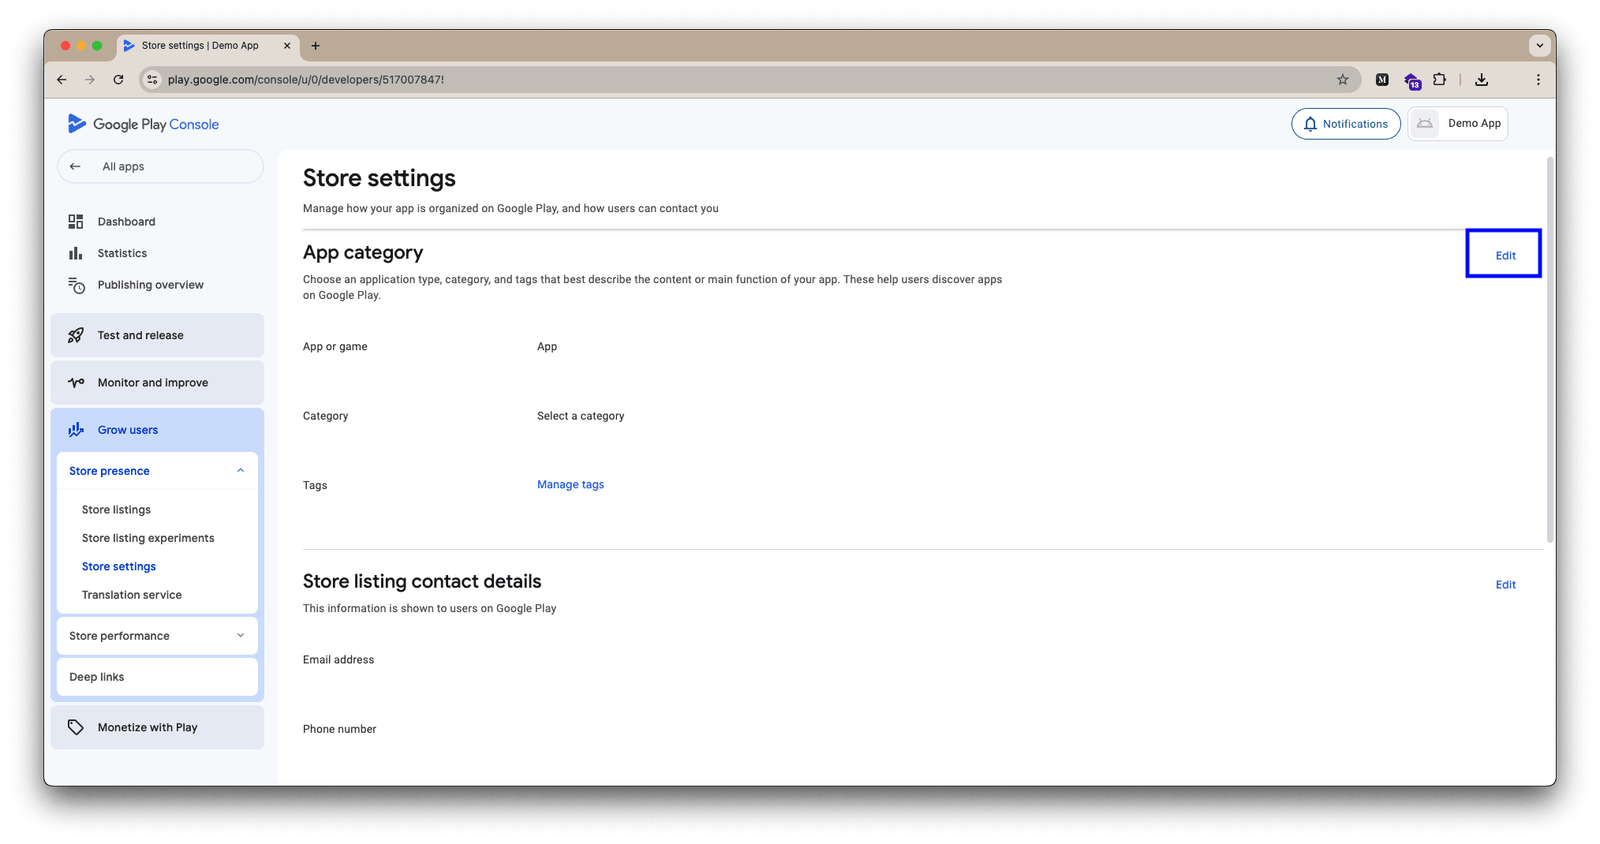
11. Categorization
Category Information
- Primary category selection
- Application tags and keywords
- Support contact information
- Email address
- Phone number
- Website URL
- Physical address
Store Listing Details
- Application Name (30 characters max)
- Short Description (80 characters max)
- Full Description (4000 characters max)
- What's New in This Release
Visual Assets
App Icon Requirements
- 512 × 512 PNG format
- Maximum file size: 1MB
Feature Graphic
- 1024 × 500 resolution
- PNG or JPG format
- Maximum file size: 15MB
Screenshots
- Minimum 2 phone screenshots required
- 16:9 aspect ratio recommended
- Minimum resolution: 1920 × 1080
- Tablet screenshots optional
12. Languages & Translations
- Default language selection
- Additional language support
- Localized store listings
- Translated screenshots and descriptions
- Language-specific assets
App Content Configuration Completed
Your application content, policies,
and store listing setup are now ready
for Google Play Store review submission.
Step 8: Testing Setup
Before publishing your application to production,
Google Play may require testing verification
depending on your developer account type.
Understanding Testing Requirements
Important:
For personal developer accounts created after November 13, 2023,
Google Play requires additional testing verification before production release.
- Run a closed test with at least 12 testers
- Testers must remain opted-in for 14 consecutive days
- Complete production access application process
Internal Testing
Internal testing is used for quick distribution
to trusted testers before public testing.
Purpose
- Quick testing and verification
- Distribute builds to trusted team members
Features
- Available before app setup completion
- Builds available within seconds
- Small trusted tester group
- Optional but recommended first step
- No special requirements for access
Closed Testing
Closed testing allows testing with a controlled group of users.
Requirements
- Complete application setup
- Minimum 12 opted-in testers
- 14 consecutive days of testing
Features
- Policy compliance verification
- Bug fixing and issue tracking
- User feedback collection
Open Testing
Open testing allows public users
to test your application on Google Play.
Requirements
- Production access approval
- Application visible on Google Play
Features
- Anyone can join testing
- Private tester feedback collection
- Public application visibility
Production Release
Production release makes your application
publicly available on the Google Play Store.
Requirements
- Successful closed testing completion
- 12+ testers for 14 consecutive days
- Approved production access request
Features
- Full Google Play Store distribution
- Public availability for users
- Access to all Play Console features
Success:
Your application testing setup is now ready
for Google Play production release.
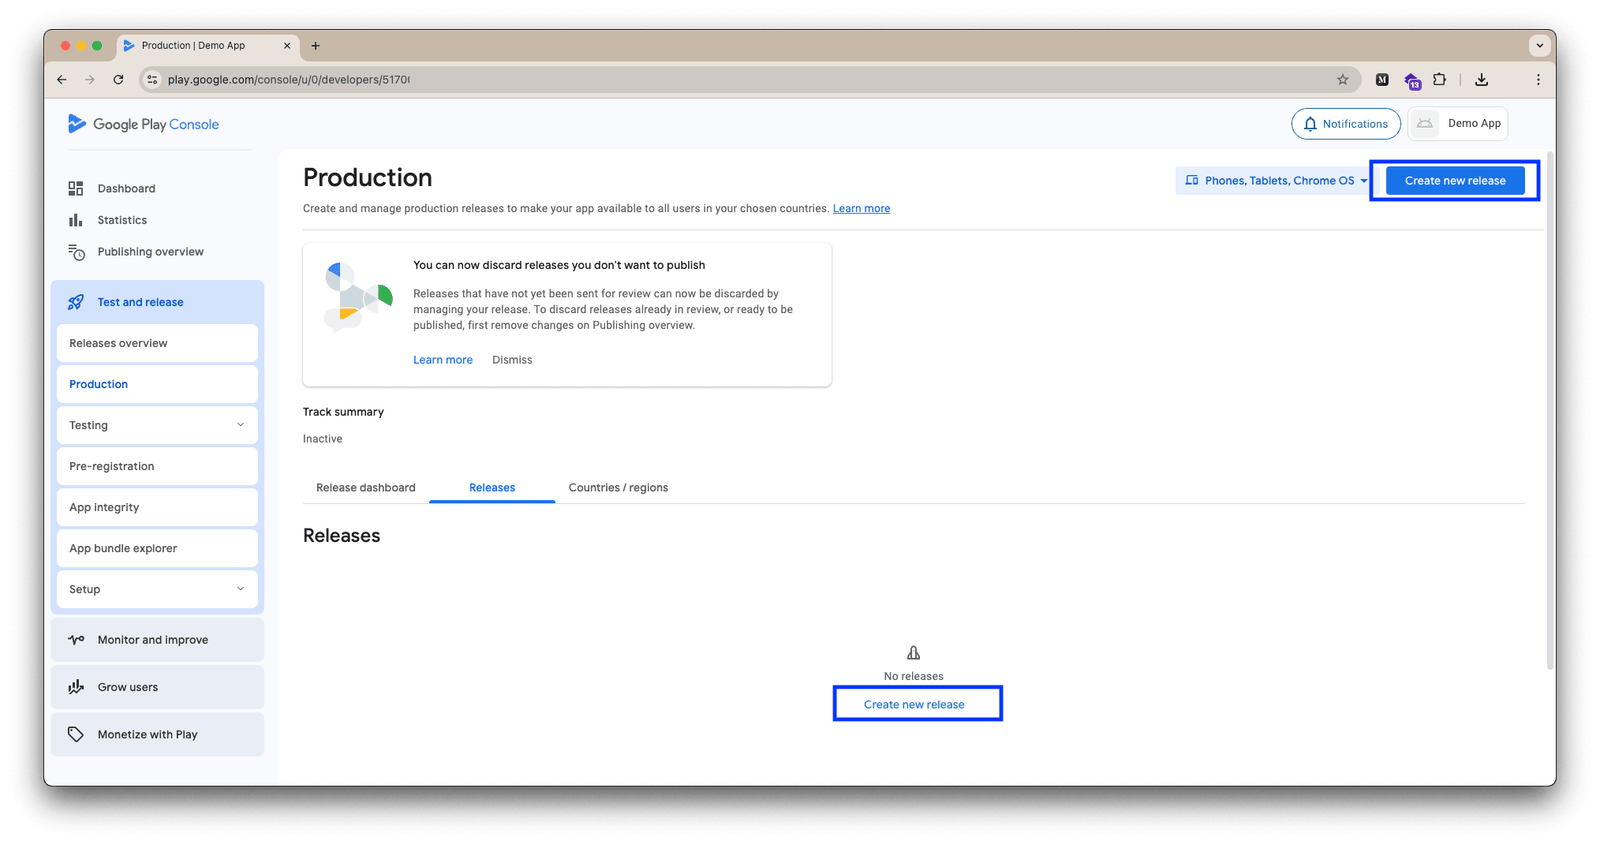
Step 9: Production Release
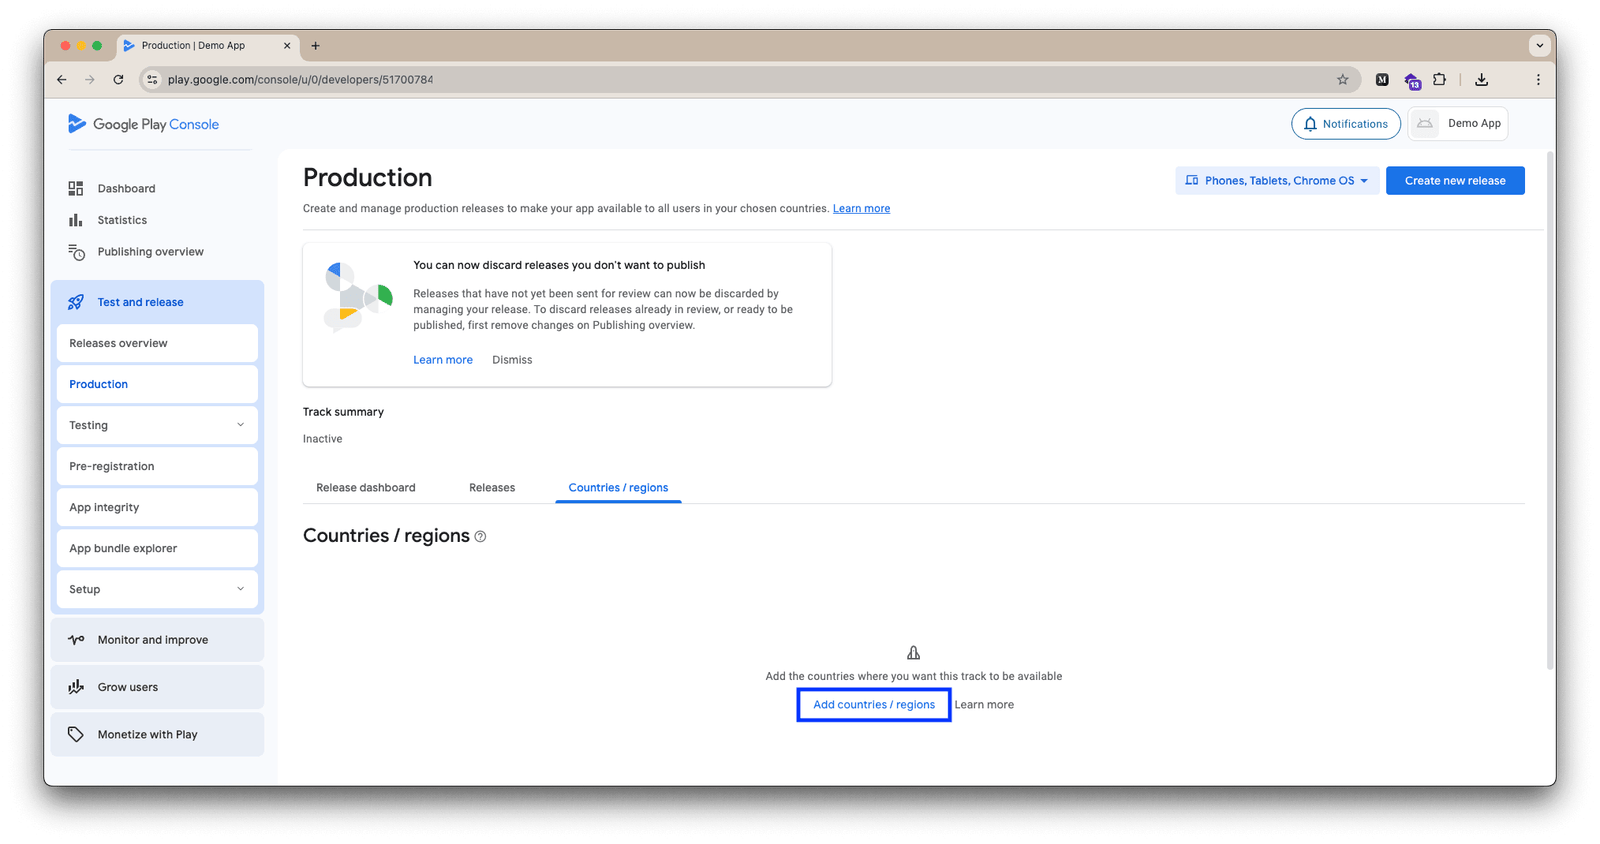
- Create production track
- Select Countries
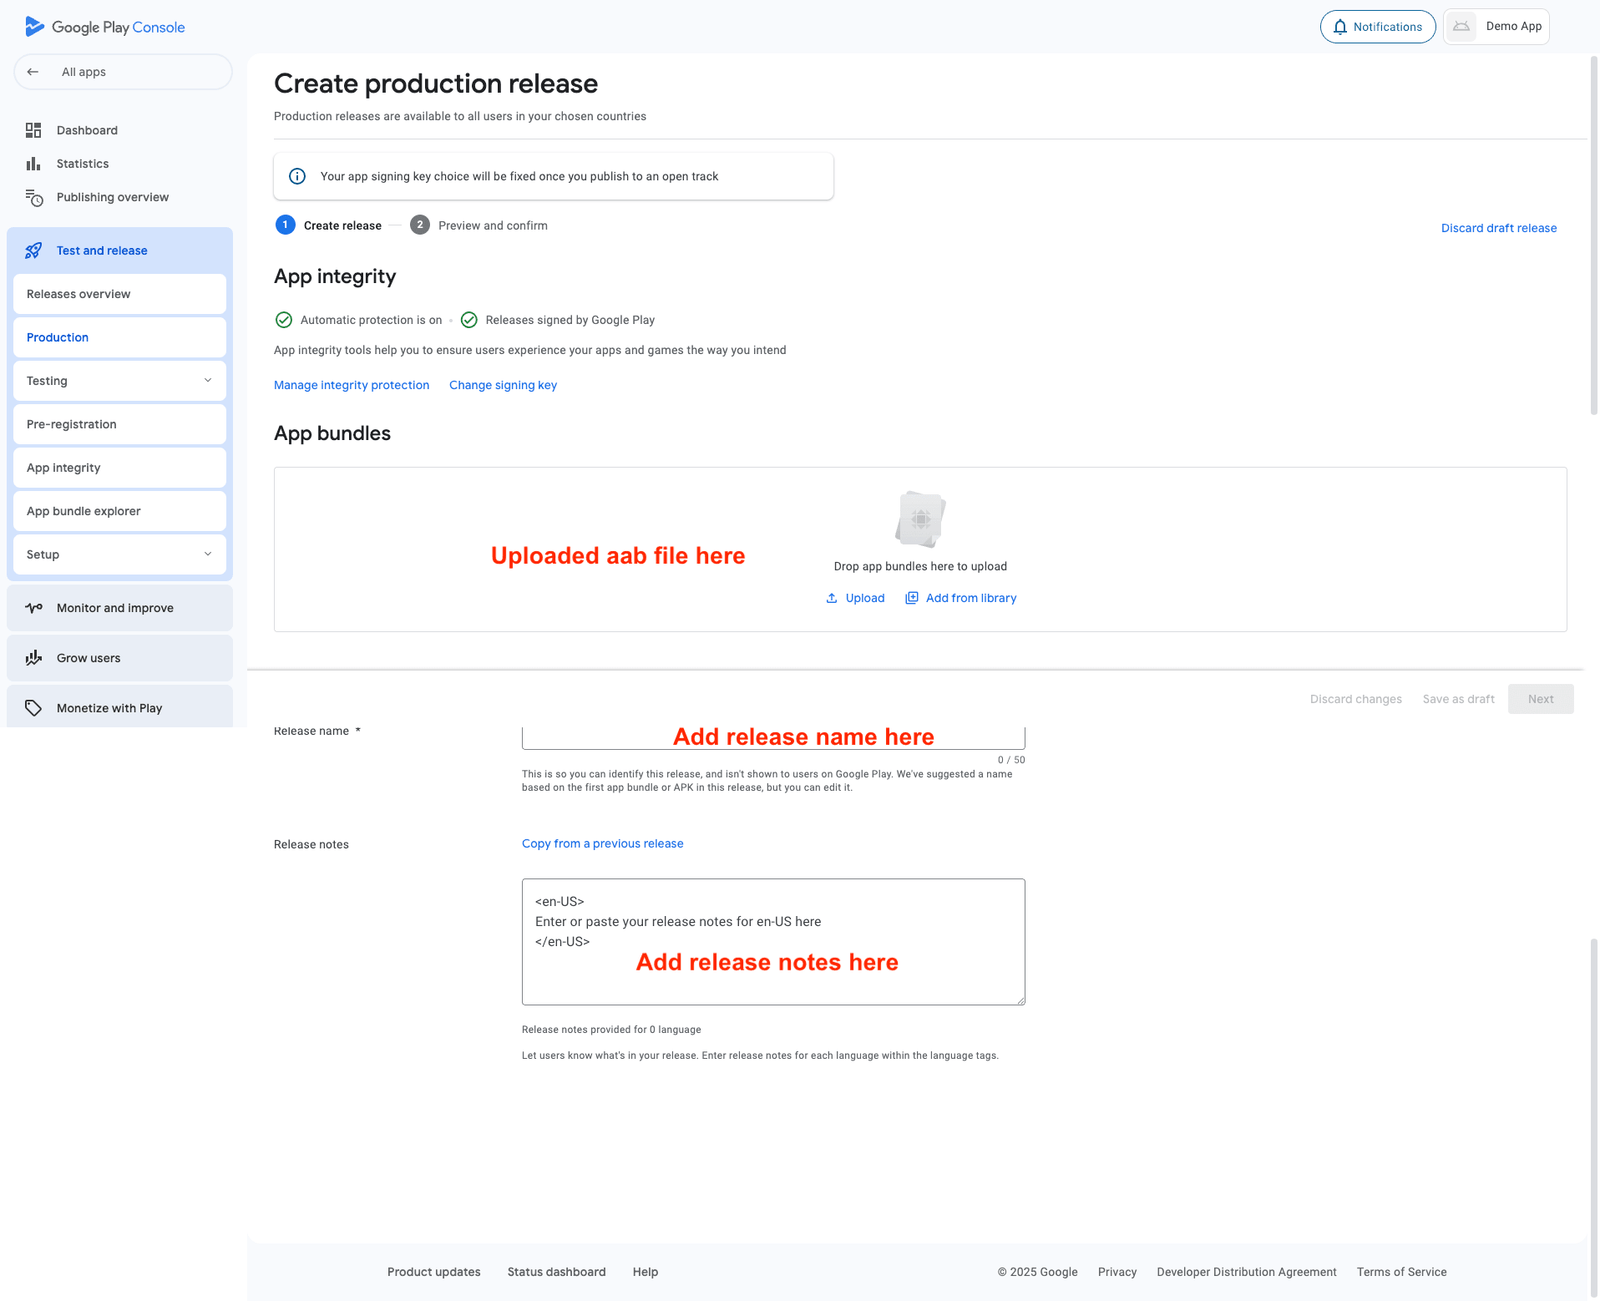
- Upload app bundle
-
Add release notes:
- What's new
- Bug fixes
- Improvements
- Configure rollout percentage
-
Review all sections:
- Store listing
- Content rating
- Data safety
- App content
- Submit for review
Step 10: Post-Release Tasks
After publishing your application on Google Play Store,
regularly monitor and maintain your application
to ensure the best user experience and policy compliance.
- Monitor Application Performance
- Track User Feedback
- Address Bug Reports
- Plan Future Updates
- Maintain Google Play Compliance
Need Help?
Feel free to contact our support team for any issues, questions, or
guidance.
Support Policy
Scope of Support
- Installation assistance
- Bug fixing & issue resolution
- Basic guidance on features
Not Included:
- Custom feature development
- Code modifications or customization
- Server configuration or hosting issues
- Third-party integrations or services
Support
Your feedback helps us improve XpressHive.
If you have suggestions, feature requests, or ideas, feel free to share them with
us.